Sunday, January 24, 2010

Short on Ribs.. not short on good!


Last week sometime,  Dad brought home short ribs to cook, so I decided to make a nice stew out of them.  I've made short ribs various ways; on the stove, in the oven, with noodles or rice... with wine, without wine.   Now the very first time I made short ribs, we had gotten a huge package of short ribs from costco.  There was about 8 huge ribs with the bone in, and after purusing the internet for a good recipe, I found one with pictures that looked incredibly delicious!  I followed the recipe, similar to what I followed here, only I used a deep rich red wine, probably a Cabernet I had, and in this recipe, I only used about 3/4 cup of Merlot.   I also cooked the first recipe in the oven.  This one is on the stove.  So I began by searing the ribs in my cast iron skillet and put them into a bigger 7 quart sauteuse pan after they browned.  I used the cast iron skillet with the fond bits still in the bottom, and added chopped celery, onion, and carrots.  I opened 2 cans of stewed tomatoes, drained the juice and set it aside, chopped the tomatoes into smaller pieces and added them to the mixture.  I then poured the vegetables over the browned ribs in the bigger pan.  I then used the skillet and added the tomato juice and a 32 oz box of organic beef broth, cooking them together for a few minutes.  After the broth heated, I poured it over the vegetables and the meat and put a cover on the sauteuse pan.  With the heat on low, I simmered the short ribs until they were tender, about an hour and a half to two hours. 
In the meantime, just before I served dinner, I sauteed 3 cloves chopped garlic in a tablespoon olive oil, and then sauteed a pound of spinach in it .   While that was preparing the garlic, I boiled some no-yolk noodles till they were tender and then drained them and put them in a bowl.   We served the stew over the noodles, with the spinach and a nice fresh salad with bleu cheese dressing that I made up.  I have to say that I got raving reviews for the stew and the spinach from both Marc and Dad, even from me! 


Bon Sauteuse!

Saturday, January 23, 2010

Cluck cluck goose..

I am going to try a new version of Chicken and Dumplings.... check back later

Tuesday, January 19, 2010

I feel like left overs...

Sunday I made baked chicken quarters and baked cauliflower with a nice salad.  I seasoned the chicken with my favorite crazy janes, and tossed the cauliflower with olive oil.  Baked cauliflower is a new discovery for me (thanks Roberta),  and since the two dishes take about the same amount of cooking time, I thought it was a perfect pairing.  I cooked the cauliflower in my new Corning Lite casserole dish, which I love!  I was picking up a few things at Target, and it was sitting somewhere out of place, which caught my eye.  I had just been complaining that the pans we have are all just too small, and this one has a plastic lid for storage as a bonus.   It cleans up really easily.  Of course, there are no pictures, I forgot.
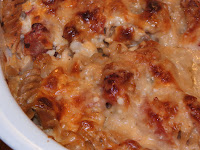
I used my new pan to make the left-over chicken into a casserole on Monday night.  I tried to use what we have around the kitchen, so first I de-boned and cut the chicken into small bite size pieces and covered the bottom of the pan.  I cooked some fusilli noodles and drained them, browned some onions, added a can of tomatoes to the pan to mix them and some seasonings, and then poured it over the chicken.  I poured in the noodles and mixed that together.  Then I took a beaten egg in a cup of cottage cheese, stirred them together and sprinkled the mixture over the noodles.  I stirred that lightly to get the cheese through the noodles.  I then covered the top with 8 oz grated cheese (half mozzerella, half parmesean).  I baked it for about 40 minutes and then took it out of the oven.  I served green beans that I simmered in chicken broth and a salad with tomatoes and avocado.  I was surprised how much Dad ate, cause he doesn't always like my concoctions.  He seemed to like this.  I would have liked a little more mozzerella cheese through the mixture, but I thought this was good for being leftovers. 
Leftovers for tomorrow!!


Restes Appetit!

Tuesday, January 12, 2010

"What a dump!"

I've been thinking about chicken and dumplings for days... I've been wishing for that hot creamy comfort food since I got sick last week.  I don't really know why, but I think because everything else made me sick to my tummy, that I had this idea that the perfect food for me would be chicken and dumplings.  Now, Dad does not like the way I usually make dumplings.  He doesn't like the thick fluffy style of dumpling.  I usually drop bisquits I have made into the hot bubbling liquid filled with chicken and broth and cook it uncovered and then covered.  Marc loves those thick kind, as do I, but I was looking for another way to do it so that it would please all of us.  My Aunt Miriam has been known to use flour tortillas for dumplings because of the simplicity and time saving steps.  I think this is a viable alternative, but  I'm only moderately happy with the results of that. I find them too much not like a dumpling.   I started my search on the internet, reading dozens (if not hundreds) of recipes, watched You Tube videos and read through my Cook's Illustrated and Cook's Country.  I found many ideas, and thought that I had decided what I would do for my new Chicken and Dumplings recipe.

First I took the leftover chicken, minus the skin and herbs in the cavity, from the fridge, and I put it in my Le Creuset pot.  I used about 3 cups of water to cook through and to soften the chicken up. I wanted to get the bones out, but get as much flavor from the meat as I could.  After the water came to a boil over medium heat, I turned the chicken cavity over to make sure both sides got cooked through.  I turned the broth off when the chicken was all cooked and let it just sit on the stove to cool while I got the rest of it ready.  I used my LeCreuset saute pan and put about 2 tablespoons of olive oil in the bottom.  I turned the heat on medium and started to chop my onion (1 whole onion) and chopped about 3 stalks of celery.  I put both of those into my pan and stirred them until the onions were transluscent and the celery tender.   By now the chicken in the pot was ready to debone.  I took the larger pieces out and cut them into smaller bite sized pieces and then made sure all the meat was off the bones of the cavity of the chicken.  I put it back into the pot and turned the heat back on it.  I opened a 32 oz (4 cups) box of low sodium Chicken broth and poured about a cup of that into the pan with the onion and celery.  I stirred it to make sure I got all the fond from the cooked vegetables into the broth and then poured it into the pot.  I added the rest of the broth to it and let it simmer on a medium low heat.  I then take the package of chicken thighs out of the fridge and opened them, washed and dried them and seasoned them lightly with my favorite pre-mixed seasoning, Jane's Crazy Mixed Up Salt.  I put 2 or 3 cups of flour in a paper bag and put the chicken into that bag and shook the chicken parts and flour so that the parts are coated.  I put 1/4 to 1/2 cup olive oil in the pan and turned the burner on medium.  When the oil was hot, I put the chicken in so that I could fry it.  It took a while, cause I had about 6 thighs, and the pan would only hold 3 at a time.  I fried them until they were cooked through and crispy.  (Marc enjoyed eating the crispy chicken skin as I pulled it off the chicken)  I drained the pieces on paper towels and then pulled the biggest pieces of skin off and "discarded" them. I then cut the chicken into small bite sized pieces and threw it into the simmering broth, vegetables, and chicken.  Although I took off most of the skin, I left on some of the crispy crust, just for fun.  After I did that, I could see that I had lots more chicken than I realized.   After it cooked for 10 minutes or so, I took a slotted spoon and removed most of the chicken from the broth and put it in a bowl to add back later.  I added a second box of broth to the pot so that it could begin to heat up.   Now for the dumplings!!
I took 2 pre-made frozen pie crusts out of the freezer and thawed them while the chicken was cooking.  I unrolled one at a time onto a floured cutting board.  I took some flour and rubbed it onto the upper side so that both sides had a light coating of flour.  I hoped to accomplish 2 things with this... keep it from sticking together, and to give the broth some thickening agent since I wasn't making my typical dumplings.   I used my knife and cut the pie crust into 1 inch squares (or 2 inch, I didn't really measure that carefully).  I tried to make them all close to the same size so that they would cook at the same rate.   When I finished doing that, I turned the heat up on the broth to a medium high temperature so that the broth would begin to boil.  As the broth began to bubble rapidly, I began to drop the dumplings into the pot.  I stirred to prevent the dumplings from sticking, but they actually seemed to do fairly well in the bubbling mixture.  When I finished adding all the cut squares into the broth, I let them cook for about 5-10 minutes uncovered.  Then, I added the rest of the chicken back into broth, spooning it in a little at a time so it wouldn't cool the broth down too much, and stirred it in.  When I finished adding the chicken, and the broth returned to a vigorous bubble, I turned down the heat to medium, put the lid on the pot, and continued cooking for about 10 more minutes.  After that, I checked the dumplings by taking one out and tasting it.  It still tasted kind of doughy, so I let it continue cooking for 5-7 minutes more.  This time when I tasted it, the dumpling was not at all doughy, or gummy, and imparted a delicate chicken flavor in my mouth.  I was actually surprised at how nice the texture and flavor was.  I turned off the heat and finished cooking the green beans and took the pot to the table.  We had a nice red leaf lettuce salad with tomatoes and avocado and the rest of the bleu cheese dressing I made over the weekend to go with it. 
I must say.... .the chicken and dumplings were divine.  I added no more seasoning than what I put on the chicken, yet it was perfectly seasoned!   Even Dad said it was very good and that he liked the dumplings done in this way.   I felt proud of myself and my new recipe!

I took this picture of my plate, with my new camera.  It makes me hungry just to look at how good it looks.  I hope it inspires you to make a nice batch of chicken and dumplings.  It is rich and creamy and oh so good!!
Boulette Appetit!

Monday, January 11, 2010

I won't be cooking for a week...


Oh dear foodie friends... I am going on a little trip up north to Chico to visit my friend Janet, so I won't be cooking or making pictures.  Today I got my new camera,  so as soon as I know what I am doing, my pictures will be closer, clearer, and crisper!! I'm looking forward to sharing my adventures with you all ! love and good food, Milo

Saturday, January 9, 2010

Tomatoes, butter and cream... oh my!

This is totally not my recipe, I found it in Gourmet magazine last year.  It is from the book, 365 Menus, 365 Recettes by Edouard de Pomiane, a food scientist who developed many simple recipes during a time when women spent all their time in the kitchen.   Simplicity was his method, and the tastes (based on this one recipe) were divine!


Tomatoes a la creme
Take 6 (ripe juicy tomatoes work best) tomatoes and cut them in half on the equator.  I have used heirloom tomatoes during the peak season (yummmmm) and those little campari tomatoes.  The campari tomatoes were too small to get the full essence of the dish because they really cooked too long and turned to more of a sauce, but made a wonderful tomato cream sauce that was divine on the fish we had prepared on the grill for dinner.   This would also make a wonderfully tasty sauce for pasta!  While you are making this dish, turn your oven on to 200 degrees farenheit and put your serving dish on the top rack to get warm.
Melt a lump of butter in a frying pan.  I like to use a large stainless steel frying pan with a copper core bottom in order for all the tomatoes to fit side by side and use a medium or slightly lower setting (somewhere between low and medium, depending on your stove).  After the butter has melted put the tomatoes in the frying pan, cut side down.   Using a sharp knife point, puncture the rounded side of the tomatoes in several places to let the steam escape.  You will want several pokes, maybe 4 or 5.  Let them heat for 5 minutes and then turn them over.  I find that using a pancake turner is the best way to turn them so that they keep their shape and turn over in an easy manner.  Sprinkle the cut side with salt (I prefer grey unrefined sea salt, or kosher salt) and cook them for about 10 minutes.  Turn them over again.  The juices should run out during this time and spread out into the pan.  Once more turn the cut tomatoes cut side upward.  Add 3 oz of heavy cream into the pan around the tomatoes (you can use creme fraiche if you prefer, but I've never used that so I cannot comment on the similarities or differences).  Mix the cream with the juices.  As soon as it bubbles, take the serving dish out of the oven using something to protect your hand like a pot holder, and then slip the tomatoes and all their sauces onto that warmed serving dish.  Serve instantly, very hot.  Delish!!
Ingredients:
6 ripe heirloom (or other nice plump tomato with a good aroma) tomatoes
2-3 tablespoons of butter
3 ounces of heavy cream or creme fraiche
salt to taste

Heaven in your mouth...
Tomate Appetit!

Friday, January 8, 2010

Friday and Soup

Being sick does not make for a good cooking experience but today the cold weather calls for some good soup!  Right before Christmas I made a pretty good pea soup from a mix, but found it to be too salty for my taste.  I added some potatoes to it to cut down on the over salty taste, and it helped, but still was more salty than I enjoyed.   Today I used some dried split peas and set out to make a good and hearty soup using the left-over New Year's Day ham, in my brand new Le Creuset Pot!


 Here is my recipe:

First I cut up a medium sized onion and cooked it down on medium heat with a little olive oil in the frying pan.  To that,  I added 2 sliced up carrots, 2 celery stalks chopped, 3 cloves of garlic chopped or diced and cooked them until they were all starting to sweat, turned down the heat a couple of notches, then added 1 cup hot water to them to get all the juices and flavor out of the pan.  I rinsed 1 lb (2 cups) dried split peas and put them in the pot.  To that I added the water and cooked onion, carrot, celery and garlic, and 7 additional cups of hot water to the pot.   I also added all the ham leftover from New Year's Day, about 1 lb or 2 cups cut up into smaller pieces. I covered the pot and stirred occasionlly,  simmered over a low heat for about an hour.   
The meal is complete with baked sweet potatoes and a salad with red leaf lettuce, sliced tomatoes, and avocado.  I will top that off with homemade bleu cheese dressing that I made earlier this week.

Bon Creuset!